Part 1: An Introduction to HTML
Each student should have created (in Lab 1) a course (Geog 353) folder on the computer C drive, and in that folder should be your own folder (with your name). In your folder should be a folder called HTML. Save all your HTML files in the HTML folder.
- Get in the habit of backing up all your work: a flash drive or Google Drive.
- Use Firefox as your browser for this exercise.
Remember: Text (.txt) and HTML (.htm or .html) files are essentially the same; HTML files are text files with HTML commands.
Each student needs to copy three text/HTML files into their HTML directory:
Click once to see the file index.htm
- select Tools >> Web Developer >> Page Source
- this shows you the HTML code for the page in Notepad
- Save it as an HTML file in your HTML folder:
- File >> Save as... index.htm
- Do the same for the geog_353_main_project-page.htm
and geog_353_animation.htm files
- Note: use either .htm or .html but be consistent.
You now have the basic files you will modify and develop into your own html files for this course.
Important: when naming files:
- Use only letters and numbers: no punctuation (except an underscore_ )
- Use all lower case letters (the OWU WWW server is case sensitive)
- Never leave a space in a file name: use an underscore: krygier_top.htm
- Limit your file names to about 10 characters, including the file extension
- Give your files names that make sense: anim_page.htm and not confusing shit like page.htm
- TIP! Look at your files in Windows Explorer (right click on Start menu). If you don't see the file extension (.htm, .txt, etc.) it is because Windows is trying to help you and instead it is making life hard for you: the files krygier.txt and krygier.htm will show up as two files named krygier and this, obviously, is confusing. Damn you Bill Gates! To change this very stupid Windows default you need to find Folder Options in Windows: Start >> Control Panel >> Appearance >> Folder Options, then select View from the options at the top of the window, and un-check the box next to the text that says "hide file extensions for known file types." Hit the Apply button and you should be able to see the file extensions in Windows Explorer.
Software you will need:
- WWW Browser: for viewing HTML files as they look on the WWW: use Firefox for now
- Text editor: for editing HTML files (Notepad)
- HTML editor: for WYSIWYG editing of HTML files (BlueGriffin)
1) open the WWW Browser (if not already open); reduce to bottom bar
2) open a text processor (please use Note Pad: on the desktop or Programs >> Accessories >> Note Pad)
- TIP! If a shortcut to Notepad is not on your computer desktop: use the FIND feature of Windows (under the Start menu) to locate the Note Pad application on the computer's C: drive. Once located, click and drag the icon for Note Pad onto the desktop. This automatically adds a shortcut to Note Pad on your computer desktop. Snappy!
3) from Note Pad, navigate to and open your copy of index.htm
- WARNING! You should see a basic text file with a dozen or so lines of HTML code and text with blank lines in between. If all the text is on one line please tell your instructor and he will provide a properly formatted file.
4) with the browser open (as a file, not a location) index.htm
- TIP! Notice that you are viewing HTML files that are on your PC (rather than out on the WWW). Obviously you can view HTML files without those files being uploaded to a WWW server. When developing HTML pages it is vital to work on and view them on your PC and refine them until they work perfectly. You then upload them to a server, using FPT (file transfer protocol) software, and then the world can look at them. We will do the FTP thing at the end of this lab.
5) compare the browser and text editor versions
- HTML code is all the stuff with < > brackets around it
- HTML is a page markup language (thus HyperText Markup Language)
6) in the text editor, change some text in index.htm
- Look at it in the browser
- Do you see it? Why not?
- Return to the text processor and save index.html
- Go to the browser
- Do you see it? Why not?
- Hit reload in the browser
- How very deeply exciting! You have now created and edited a HTML file. Vuzza ho!
7) Navigate to the Visual Guide to
HTML using your browser.
Carefully read the introductory information about setting up your HTML files.
Compare the browser view with the text (HTML) view: while in the browser view the page source of the Visual Guide.
You should see all the HTML code and text for the Visual Guide. When you see an HTML effect you want to use in your own pages, view the source HTML and copy the HTML code (Control-C) and paste (Control-V) into your own HTML page. You can do this with any HTML page you find on the WWW. When you see something interesting on a HTML page, you can see and even copy how they did it.
- Copy the HTML code for a "horizontal rule" and put in your HTML page
- Save the image below to your desktop and figure out how to embed it in your HTML page

The Visual Guide allows you to see basic HTML functions as the look in raw HTML and as they look in a WWW browser. Use the Visual Guide to start developing your HTML pages. It has all the HTML basics you need to complete this Lab.
Do the following basic stuff with your web pages:
1. Use Tables to create a basic layout for your pages: yes, it is true that CSS (an enhanced component of HTML) provides a better way to control web page layout, but we don't really have time to learn CSS in addition to basic HTML in this class (feel free to look into it on your own).
- Think about the basic components that will need to be on each page:
- Page title / subtitle
- Main content area
- Navigation links (to your other pages, OWU, etc.)
- You may want to keep the title/subtitle and navigation areas the same on each page,
but divide up the main content area in different ways. The title/subtitle area should
probably be on the top (or maybe left, in a column). The navigation links can be a
series of horizontal cells, under the title/subtitle, at the bottom, or in a left
side column.
- Look at the following sites showing some basic table page layouts & code:
- Think about your content and these options and choose a table layout that works for you. You can copy and paste from one of the sites above, or use the BlueGriffin table generator to create the table for you. Find out how to modify the table properties to modify the way your table looks (to make the table outlines invisible, or modify the cellpadding, for example).
3. Pay attention to the design and funcionality of your page - ask you instructor or the person next to you for feedback.
4. Modify the rest of your HTML pages (Main Project Page, Animation Page) so they are consistent in design with your index.hmtl file ... for example, the navigation links on each page should be similar from page to page.
5. Take a few minuets to explore the internets to find out more about HTML commands.
- While you may be tempted to scamper out and buy an HTML book, there are many
great sources available free on the WWW. Check out the Compact Guide to HTML
site, for example. Include it as a link in your lab log blog entry for this
lab. Go to Mozilla HTML Resource Page and
explore these free sources of information on HTML and HTML commands.
Save the address of at least one of these sites, and include it in your lab
log blog entry for this lab.
- Using the information and resources you have learned about so far, complete the basic course WWW pages & blog.
- REALLY BIG TIP: The HTML pages you create for this course constitute the final form of your course project. The HTML pages will be placed on the OWU WWW server, and anyone in the world with WWW access can see them. Do keep in mind that your WWW pages represent you, your instructor, and Ohio Wesleyan University. You would not include copyright infringements, speelling errors, and other outrages in a paper or project you complete for a university course, so avoid them in your WWW pages. I don't want to be a censor, or limit your fun with WWW pages. Just use some common sense.
Create a blog for your lab comments (your lab log blog) at WordPress. This replaces the Word doc Lab Log you started in the last lab.
- Quick setup of new blog (in class).
- Log into Wordpress.com if you have an account and add a new blog.
- If you don't have an account, start here
- include a link in the blog back to your HTML pages, and a link to the blog in your HTML pages. This will be a url something like this: http://mygeog353blog.wordpress.com
A map mashup is simply a map created from at least two different digital data sources. A scripted mashup (eg., not a Google My Maps map) requires you to know a bit about HTML, thus this lab is an appropriate place to create one. You will use Google's API (Application programming interface) which allows you to combine your data with Google Maps data.
For example, here is a simple map mashup combining some of the KMZ files you sent me (Exercise 1) along with Google's map data: Map Mashup
Google's basic bit of geographic data is a KML file. You can open and view KML files with a text processor (like NotePad). KMZ is compressed - a smaller file size but you cannot open and view the content of the file.
- Modify the Map Mashup we just viewed
here so that it works for your state(s) and project. As with the basic HTML files
you got earlier in this exercise, view the source and save the file to your HTML folder.
- There are a series of things you will change in the file, what the map looks
like, where it is centered, and, of course, your points of interest (located
using Google Earth in the previous Lab). Only modify the things detailed below:
Really, really important: when you change things in the map mashup HTML file make sure to make one change, then save, then view the page in your browser. If it works, great, if not, go back to your text editor and HTML page and undo the change. If you change 10 things, then save and view, and it does not work, you don't know where you made the error.
- Change the map title to something appropriate
- You can put text or images describing the map and sites on it above and below your map; in the
HTML file the places for normal HTML stuff are indicated.
- Take a look at the comments in the map mashup HTML file. These indicate variables you
can change, such as the zoom level (scale), etc.
- You can add your data to the Google Map in various ways. The two ways shown in this
example are a single point (located by actual latitude/longitude in the HTML, and a
link to a KMZ file that is saved on your OWU webspace. This file needs to be accessible
on the web so Google can access it. Details:
- For the single point, follow the comments (after //) in the map mashup HTML
- For the kmz file, follow the comments (after //) in the map mashup HTML
- To get the lat/lng of your home: While in Google Earth, right-mouse-click on a placemark and select Properties for the latitude/longitude (which you can copy and paste into your mashup) for each placemark. The lat/long must be decimal degrees. If the latitude/longitude are in degrees/minutes/seconds (43°17'2.74"N) go to Google Earth's Preferences and change Show Lat/Long to Decimal Degrees. Replace the coordinates of the points (Krygier's home) in the HTML file with your coordinates.
- For the single point, follow the comments (after //) in the map mashup HTML
- Change the map title to something appropriate
- Save the map mashup file when you have made the appropriate changes. Place the
map mashup and .kmz files in your HTML folder on your lab pc.
- Check that your OWU web server space exists: http://go.owu.edu/~yourowuusernamehere
- You should see this: ** this new home page was generated on request for (yourowuusernamehere) but has not yet been customized **
- if not, let you instructor know
- You should now be able to use the FTP software (see below) to upload the two files (the mashup HTML and .kmz) to your OWU account and it should work. Freaky! Link the page to your other HTML pages and make sure people viewing your page know there is a map mashup with sites relevant to your project on that page.
- You should see this: ** this new home page was generated on request for (yourowuusernamehere) but has not yet been customized **
- The API key allows you to create a map mashup using Google Maps.
- API key procedures have
changed: Google now requires an account with an attached credit card. They give you the first $300 of usage
(more than enough for a small project like ours). If you want to get your own API key you can,
but it is less hassle to use mine (which is already set in the map mashup HTML).
- Lots of info on how to get an API key and expand your map mashup at
Google's
Map API Help pages.
- API key procedures have
changed: Google now requires an account with an attached credit card. They give you the first $300 of usage
(more than enough for a small project like ours). If you want to get your own API key you can,
but it is less hassle to use mine (which is already set in the map mashup HTML).
Complete modifications on your HTML pages: they should all link together and look decent:
- A personalized home page (index.htm)
- A personalized project page (geog_353_main_project-page.htm)
- A personalized animation page (geog_353_animation.htm)
- A personalized mashup page (geog_353_mapmashup_2018.htm)
- Your KMZ file of 15 points (geog_353_lab02_mashup_f18.kmz)
- A personalized lab log blog at Wordpress.com
Upload your four interlinked HTML pages to your web space on the OWU server using FTP
(file transfer protocol) software.
- You should have some server space for your web pages already
created on the OWU server. If you don't, ask your instructor for help.
- Find FileZilla Client software and open it. There should be a shortcut to this
software on your computer desktop. If not, check in the programs folder. When the
software starts you should see this:

- For the host use sftp://cc.owu.edu, and for the Username
and Password use your OWU email ID and Password, then hit Quickconnect.
Believe it or not, sftp stands for soft frickin' toilet paper.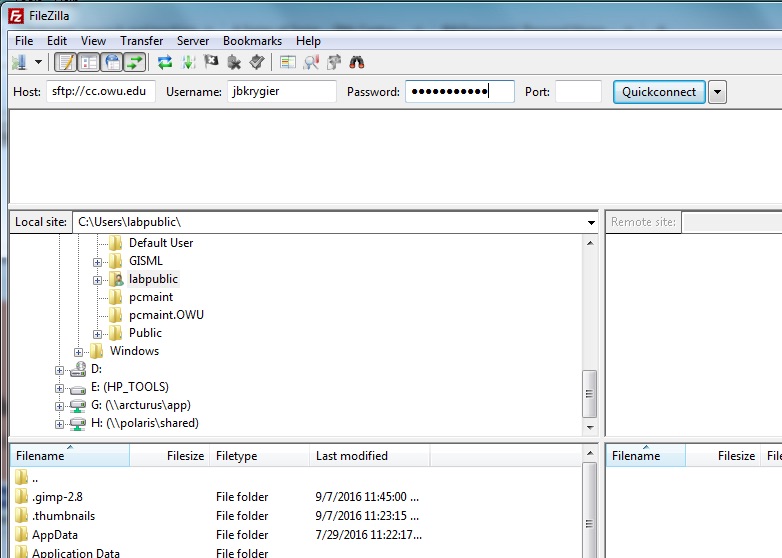
- The top window shows messages from the server; the side by side windows below
show the files on your computer (left) and on your server space (right).
- Navigate to the directory where your HTML files are saved on your computer using the
left window. Open the public_html directory in the right window.
Don't fool around with or delete any other files on the server, it can mess up your
email account. All HTML files should be put in the
public_html directory on the WWW server. There should be a default
index.htm file already in your public_html directory on the
OWU WWW server: right mouse click on this file and delete it.
- Select all your HTML files and any images from your HTML folder on the
PC and drag them to the public_html folder.
- Disconnect and quit the FileZilla software when you are done.
- Open a browser and navigate to go.owu.edu/~yourowuusernamehere. Of course, substitute your OWU user name. You should see your new WWW page: anyone, anywhere in the world with WWW access can see it too.