Geography 222 The Power of Maps and GIS
...to Geog 222 Main Page and Course
Description
...to Geog 222 Syllabus
...to Geog 222 Course Schedule
...to Geog 222 Exercises
Geog 222 Exercise 1: Mapping PsychoGeographies
Revised: 9/12/11
- ASSIGNED in class Wednesday August 31
- DUE in class Wednesday September 7: group update on progress
- DUE by 10 pm Sunday September 11: email digital copy of Exercise 1 (so I can upload to class website for your presentations)
- DUE group presentation of project in class Monday September 12 & Wednesday September 14
- Exercise Worth: 50 pts
- Geography 222 Spring 2011 Psycho-Sensory Projects
- Geography 222 Fall 2010 Psycho-Sensory Projects
- Geography 222 Spring 2010 Psycho-Sensory Projects
- Geography 222 Fall 2008 Psycho-Sensory Projects
- Geography 222 Fall 2011 Groups (look up your namesake here):
Procedure:
On your "Age of Majority": If you are not yet 18, please talk to your kind instructor. I would
gladly send my kids (6 and 10) on this psychogeography expedition but you may be a bit more delecate.
I would hate to have you call your mommy in a panic after finding yourself walking down an unfamiliar
street! If you are 18 or more, you are an adult and shouldn't have to call your mom if you get scared
or a bit uncomfortable. This is the point of the exercise!
On "Engaged Discomfort": Getting out of your comfort zone is a useful pedogogic
strategy. Discomfort (of diverse kinds) leads to physical and mental engagement which may serve
to get your brain going and encourage insight, learning, and understanding. Thus walking about
unknown territory paying attention to sensory and emotional imputs may be uncomfortable at
times, but you will get something significant out of the experience. Just keep in mind that it
is OK to be a bit uncomfortable. This is the point of the exercise!
Please review the materials on this page before you go out on your psychogeographic
expedition. In particular, the links in part 3 have many useful resources and things to think
about (which will lead to a better project)
Please work in groups: 2 or 3 persons. This means you have to
contribute to a group effort. Don't be a moran and undermine the group effort.

- Get in groups!
- One person from each group: email (now!) full names of all group members.
- Official PsychoGeography Investigator card: get a copy from your instructor
and use if you are questioned
by irate authorities. I doubt anyone will care about what you are up to, but if they feel
the need to yell at you, have them call and yell at me instead: 368-3622
(ha! that is my office phone I never check).
Select one of two approaches: more inside than out or more outside than in.
OPTION 1: More Outside than In (for September - fall semester - or brave January drifters)
Get in your groups.
- Start with a paper copy of the Delaware area. You can print this map (monochrome or color is ok):
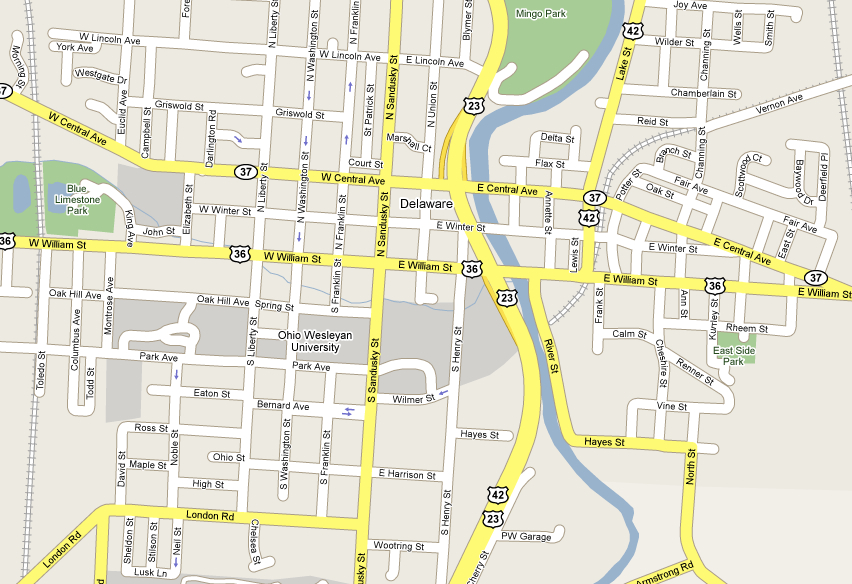
- Have one group member close their eyes: with the map in front of them,
draw a rough circle on the map (like below)
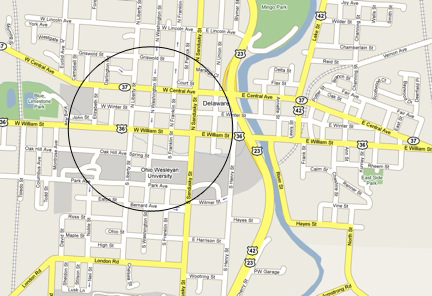
- Please make six copies of the map, with your route, one map for each of
the categories of psycho phenomena (in section 3 below).
- You will explore the circular route; also investigate TWO buildings along
the way: try to find the lowest and highest you can get in the building, or go
somewhere peculiar in the building.
OPTION 2: More Inside than Out (for January drifters - Spring semester)
Whilst in your groups.
- Print a copy of the OWU campus map (as below
or here). It does not have to be printed in color.
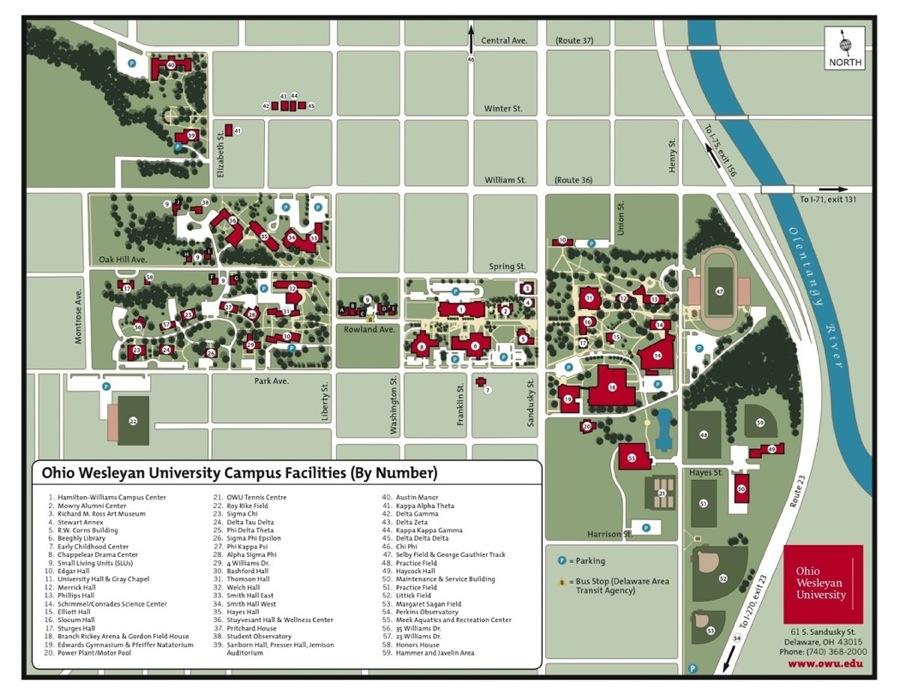
- Have one group member close their eyes: with the map in front of them,
randomly drop four points. These should fall off campus (on different
parts of the map). Keep trying until you get four decent off campus locations.
- Select five numbers, between 1 and 54 and write them down.
- Mark on the campus map the OWU buildings/facilities which correspond with
the first four numbers. If any of the buildings/facilities seem to be a bad
choice (eg., the observatory is locked up) use your fifth number as
a backup. Use the fifth number (building) if you find you cannot access a building
while out in the field.
- Connect the dots - the four buildings and four off campus locations. Use
Google Maps or some other source to clarify the locations of the four
off-campus locations.
- Make sure you have six copies of the campus map (with your buildings, the four off-campus
points, and the path connecting them all) so you
get all the stuff (below) mapped out. You can xerox your original map with your path. Also take along at least 5 pieces of blank
paper to sketch details of your explorations inside your four buildings.
- Head out: please walk through the buildings you chose
for your
expedition and note any of the characteristics outlined below. For each
building, head down to the basement and up as high as you can get, and try to get into
at least one area you are not supposed to be in. Create a quick sketch map of the
building and your path through it. Greet alarmed building dwellers with a
cheerful smile and "hello, friend!" Tell them you are an official psychogeography inspector,
and show them your card.
2. "Derive" (walk) the Line and Map What You Find
- Remember the most important part of a psychogeography "drift" (wander, maunder, etc.):
you must pay attention to the environment you pass through using all
your senses.
-
- This should be fun. Or terrifying.
Or at least disconcerting.
Please don't kill yourself; eg., avoid aimless drifting across busy highways, into rivers,
or into blazing furnaces.
- And always remember...

3. Include the following features on your map
- Annotate your map as you wander. Use colored pencils, pens,
crayons, fingernail polish - whatever - to annotate your map. A clipboard helps too.
- I expect mapped stuff from each of the 6 categories below.
- You may want to assign certain categories (of the six below) to specific people, or walk the route
six times as a group (two sensing, one documenting), or whatever works for you.
- Since our sense of sight is so strong, please blindfold a group member (for at least
part of the drift) to collect sound and smell data. You may want to share this part of the
effort (each take a turn being blindfolded).
- Feel free to snap a few photos if they will help document your experiences. You can
include them with your final map.
- Refer to the
lecture outline on sensory aspects of the environment if you need to refresh your
memory. More information is available below (will review in class).
- Please note any deep philosophical insights, curious events, strange encounters, etc.
as I will ask you to reflect on this exercise as part of the first exam.
- Remember: you are the data collection device. You may not be good at collecting
exact data on temperature or elevation but you are great at things like smell, sound,
touch, and overall feelings about places.
- 1. The Soundscape: any sounds whatsoever; feel free to wander off your path
to investigate any alluring (mysterious, offensive) sounds. Focus in particular on
sounds that you may not typically notice when zipping through the landscape.
- 2. The Smellscape: any smells you notice; again, wander off your path if you
find something which attracts (or repels) your olfactory sense. Take a dog along and
see if they find anything interesting. Again, note smells that are dominant, but also
pay attention to subtle aspects of the smellscape.
- 3. The Touchscape: This one is a bit more challenging. We do notice
textures and how they vary through a place: for example, when we walk from a field to a
lawn to blacktop to laundry. Use your feet (maybe take off your shoes for the walk?)
and hands or whatever part of your body you want. Think of creative ways to document the
touchscape. For example, you could document excellent, ok, and poor feeling places for an
outside snooze.
- 4. The Tastescape: Even more challenging. We certainly are aware of taste
when it comes to food (flavor: a combination of taste and smell) but how do you document
the tastescape of a place? This is a real challenge but should result in some creative
efforts. I leave it up to you to successfully map the tastescape.
- 5. The Sadly Not Very Often Mapped: Review the selection of maps in Denis Wood's Atlas of Boylan Heights (blog post link below)
and consider mapping at least two items that don't typically show up on maps.
- 6. The PsychoScape: Finally, in the grand tradition of PsychoGeography,
document your general overall feelings about the places you move through. Consider some
of the following impressions (you can add more):
- dark - light
- tight - open
- flowing - constrained
- water - stone - pavement - green
- cool - warm - hot
- welcoming - hostile
- playful - serious
- social - antisocial
- weak - strong
- empty - full
- old - new
- fear - safety
- trapped - loose
- comfortable - uncomfortable
- belong - don't belong
- flat - bumpy
- beautiful - plain - ugly
- visible - hidden
- strange - normal
- boring - exciting
- distracting - attracting - repelling
- happy - sad
- walky - drivey
- slippery - stable
- ... and so on
- Review Mapping Psychoscapes
- Create symbols for stuff on your map, a legend where you explain what the symbols mean, and
annotate your map.
- You may create one map with all your info, or a series of maps (if you have too much for one map).
- You can create your map/maps by hand on paper (and scan) or use any kind of graphic software you
are familiar with.
- It often works well to cut and paste (by hand or computer) content on top of a map of the
area you explored (maps can be from any source).
- Please include images (cell phone ok) and other graphics to enhance the content of your map
- For ideas, take a look at previous semester Psycho-Sensory Projects - linked at the top of this page.
- I will dole out grades based on the quality and creativity of your project in relation to
other projects in this class.
- You have quite a bit of time for this project so I expect some creative work.
- Be creative! Anything goes! The more interesting the better your grade!
4. Project Description
- In addition to your map or maps, please compile a 2 page description of
your group project: one report from each group:
- Full names of all project participants
- One page (or so) description of what each person in the group did
- One page (or so) description of any interesting experiences you had
whilst drifting about, and a few reflections on your experience.
- Save this as a Word document, or PDF, or Open Office document.
What's Due:
- PDF or JPG of the maps from your group, annotated with group member names, title, symbols, legend, and written details
which explain what you found
- PDF or Word Doc or Open Office Doc of part 4. Project Description (see above).
- Email this work to your
instructor. Make sure I respond that I got your work. If you have questions about getting
all your stuff in a digital file let me know (see the Digital Submissions Guide). We will view them on the screen in class on the due date.
E-mail: jbkrygier@owu.edu
...back to krygier top page.
...to krygier teaching page.
...to geography 222 exercise page.
OWU Home
OWU
Geology and Geography Home